Here is the recipe for one gallon of yogurt.
 Ingredients:
- One gallon less one-half cup milk
- One-half cup heavy cream or half & half, optional
- Four tablespoons plain yogurt
Notes about the ingredients:
Use milk that you like. There is a good chance that you will like the yogurt that you make if you like the milk from which you make it.
Add the heavy cream or half & half if you like a thicker, creamier yogurt. If you choose to add either of these, make sure that there are no additives in the cream or half & half. Many companies, even organic processors, will put stabilizers in these fatty milk products to prevent them from separating.
Check the ingredients on the yogurt you are using as starter. Be sure it contains live cultures. Read all the way to the end of the list of ingredients and beware of any additives or stabilizers like pectin. When I have used yogurts with additives as a starter, the results have been slimy. Yuck. You can also buy freeze dried yogurt starter. That is a more expensive route to go, but the results are very predictably smooth and creamy.
Equipment:
- One large stainless steel pot
- One digital, instant read thermometer, optional and totally worth it
- One large stainless steel spoon
- Four wide mouthed, quart sized canning jar with lids
- One stainless steel ladle
- One canning funnel
- One plastic cooler with lid
Notes about the equipment:
Try to avoid spending lots of money on equipment for your yogurt production until you are sure that you like doing it. Many people have much of what they need for this project, even if it doesn't exactly fit into the above list.
In Wild Fermentation, Sandor Katz gives great descriptions for determining temperature by feel in yogurt making. If you want to avoid getting a thermometer, you can learn to use your finger as a gauge instead.
Everyone needs something in which to incubate the yogurt. I use a plastic cooler with towels thrown over it. Some people can use their ovens. Some people use heating pads and blankets or towels. Look at what you have and experiment with your incubation on small batches until you find a method that works for you.
In all my fermentation projects, I try to use vessels and equipment that are easy to clean. Remember, fermentation is about microbe management. Stainless steel and glass seem to be so much more reliably clean than plastic and wood. Use what you have and feel comfortable using.
The canning funnel is not necessary, but makes getting the hot milk into the canning jar so much easier. You can find one at a hardware or farm store for about two dollars.
Method:
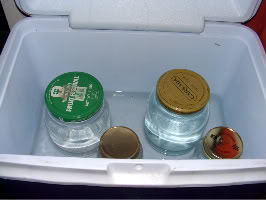
- Preheat the wide-mouthed quart canning jars and plastic cooler with very hot tap water: Fill the jars, cap them, and then place them in the empty cooler. Add more jars filled with hot water to the cooler to take up additional space if necessary. Now fill the cooler with hot water until the water level is just below the bottom of the preheating jar caps. Close the cooler with the jars in it, and set it aside in a place where it will be out of the way, safe from drafts, and can be left undisturbed. Cover the preheating cooler with a towel, blankets and/or raincoats.
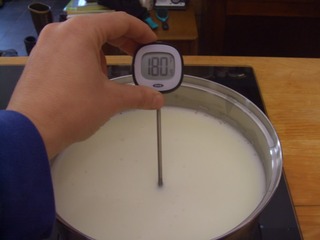
- Over medium heat in a stainless steel pot, warm the milk and cream. Stir occasionally with a stainless steel spoon as it warms. Check the temperature after stirring. Remove the milk from heat after it reaches 180 degrees Fahrenheit.
- Set aside four tablespoons of yogurt starter in a mug or small bowl.
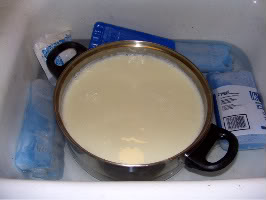
- Either allow the warmed milk to cool on its own, or rapidly cool it. To rapidly cool it, run cold tap water into a stopped-up sink. Add ice cubes or several ice packs. Set the pot of heated milk into the ice water. Stir and take the temperature often. Remove the pot from the iced water when it reaches 125 degrees Fahrenheit. It takes about five minutes to rapidly cool the milk.
- Add a ladle full of the cooled milk to the mug with the yogurt starter in it. Stir well. Pour the milk and cultures back into the pot with the cooled milk.
- Remove four wide-mouthed quart jars from the cooler. Empty the hot water out of the jars. Using your canning funnel to avoid spills, ladle or pour the milk with cultures into the warmed jars and cap them. Place the re-filled jars back in the cooler with the hot water in it. Cover the cooler, close it, and place one or two towels over it.
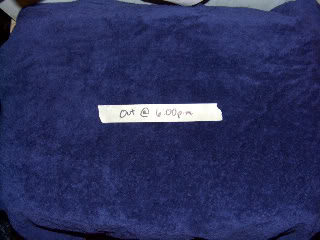
- To determine the time to remove your yogurt from the incubator, add eight hours to the time at which you closed your cooler. Write "Out at (the removal time)" on a piece of masking tape, and place it on top of the cooler cover. Leave the incubator undisturbed.
- When the incubation time ends, uncover and open the cooler. Remove the jars with yogurt in them. Dry off the outside of the jars and place them immediately in your refrigerator.
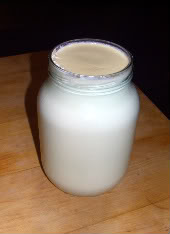
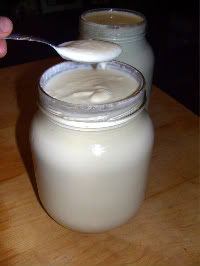
- After the yogurt has completely cooled, open a jar, admire your cream-line (if you have one) then gently stir the yogurt. Taste it. Evaluate it. Creamy enough? Thick enough? Tart enough? Write some notes about your results. Give yourself a pat on the back for making yogurt.
Thick, creamy yogurt that has been cooled
